Kargo Quickstart
Kargo is an open-source project that streamlines how applications are promoted across environments, extending GitOps beyond deployment.
The Pipeline You'll Create

Spin Up a Local Cluster With Kargo Installed
Pick your local Kubernetes setup. One command installs cert-manager, Argo CD, and Kargo.
- Docker Desktop
- OrbStack
- kind
- k3d
- Custom
If you are a Docker Desktop user, you can follow these instructions to enable its built-in Kubernetes support.
curl -L https://raw.githubusercontent.com/akuity/kargo/main/hack/quickstart/install.sh | sh
This is one of the fastest paths to a local Kubernetes cluster, but be aware that Docker Desktop supports only a single Kubernetes cluster. If that cluster reaches a state you are dissatisfied with, resetting it will remove not just Kargo-related resources, but all your workloads and data.
OrbStack is a fast, lightweight, drop-in replacement for Docker Desktop for macOS only. You can follow these instructions to enable its built-in Kubernetes support.
curl -L https://raw.githubusercontent.com/akuity/kargo/main/hack/quickstart/install.sh | sh
This is one of the fastest paths to a local Kubernetes cluster, but be aware that OrbStack supports only a single Kubernetes cluster. If that cluster reaches a state you are dissatisfied with, resetting it will remove not just Kargo-related resources, but all your workloads and data.
If you have any Docker-compatible container runtime installed (including native Docker, Docker Desktop, or OrbStack), you can easily launch a disposable cluster just for this quickstart using kind.
curl -L https://raw.githubusercontent.com/akuity/kargo/main/hack/quickstart/kind.sh | sh
While this option is a bit more complex than using Docker Desktop or OrbStack directly, it offers the advantage of being fully-disposable. If your cluster reaches a state you are dissatisfied with, you can simply destroy it and launch a new one.
If you have any Docker-compatible container runtime installed (including native Docker, Docker Desktop, or OrbStack), you can easily launch a disposable cluster just for this quickstart using k3d.
curl -L https://raw.githubusercontent.com/akuity/kargo/main/hack/quickstart/k3d.sh | sh
While this option is a bit more complex than using Docker Desktop or OrbStack directly, it offers the advantage of being fully-disposable. If your cluster reaches a state you are dissatisfied with, you can simply destroy it and launch a new one.
If you are averse to piping a downloaded script directly into a shell, feel free to download the applicable script and inspect its contents prior to execution.
Any approach you select should only:
-
Launch a new, local Kubernetes cluster, if applicable
-
Install cert-manager
-
Install Argo CD
-
Install Argo Rollouts
-
Install Kargo
Troubleshooting
-
401 Unauthorized:
Ensure you are using Helm v3.13.1 or later. Earlier versions may not authenticate properly when pulling the Kargo chart.
-
403 Forbidden:
This is commonly caused by Docker attempting to authenticate to
ghcr.iowith an expired token. The Kargo chart and container images are publicly accessible and do not require authentication. To resolve the issue, log out ofghcr.io:docker logout ghcr.io -
Argo CD UI flashes on login with no error message:
If the Argo CD UI/dashboard briefly flashes or redirects back to the login screen without displaying an error, this may be caused by stale or corrupted browser cookies. Clear your browser cookies for
localhostor open a new private/incognito window and try logging in again.
| 🚀 Argo CD | 📦 Kargo |
|---|---|
URL: http://localhost:31080 | URL: http://localhost:31081 |
✅ Argo CD and Kargo are now running locally.
Set Up Your Demo Repository
-
Fork the sample repository:
Go to https://github.com/akuity/kargo-demo and click Fork. This repository contains application configurations (e.g. Kubernetes manifests) and is the source of truth for our demo cluster. In a real setup, you would create your own configuration repository from scratch.
-
Get a GitHub personal access token (PAT):
Kargo will push changes to your fork for test, uat, and prod environments. You need a PAT with write access to your fork.
Need a GitHub personal access token (PAT)?
-
Navigate to GitHub → Settings → Developer settings → Personal access tokens → Fine-grained tokens, then click Generate new token.
-
Under Repository access, select Only select repositories and choose your fork.
-
Under Permissions → Repository permissions, set Contents to Read and write.
-
Click Generate token and copy it — it won't be displayed again after navigating away from that page.
-
-
Set environment variables:
export GITOPS_REPO_URL=https://github.com/<your github username>/kargo-demoexport GITHUB_USERNAME=<your github username>export GITHUB_PAT=<your personal access token>
Kargo follows GitOps principles: Your cluster's desired state always comes from Git. Kargo promotes artifacts by committing updated configurations to Git. Argo CD picks it up and syncs the cluster. Git becomes a full audit trail of every promotion.
What's in the kargo-demo repository?
You can explore the repository and see that the main branch contains common
configuration in a base/ directory as well as stage-specific overlays in
stages/<stage name>/ directories.
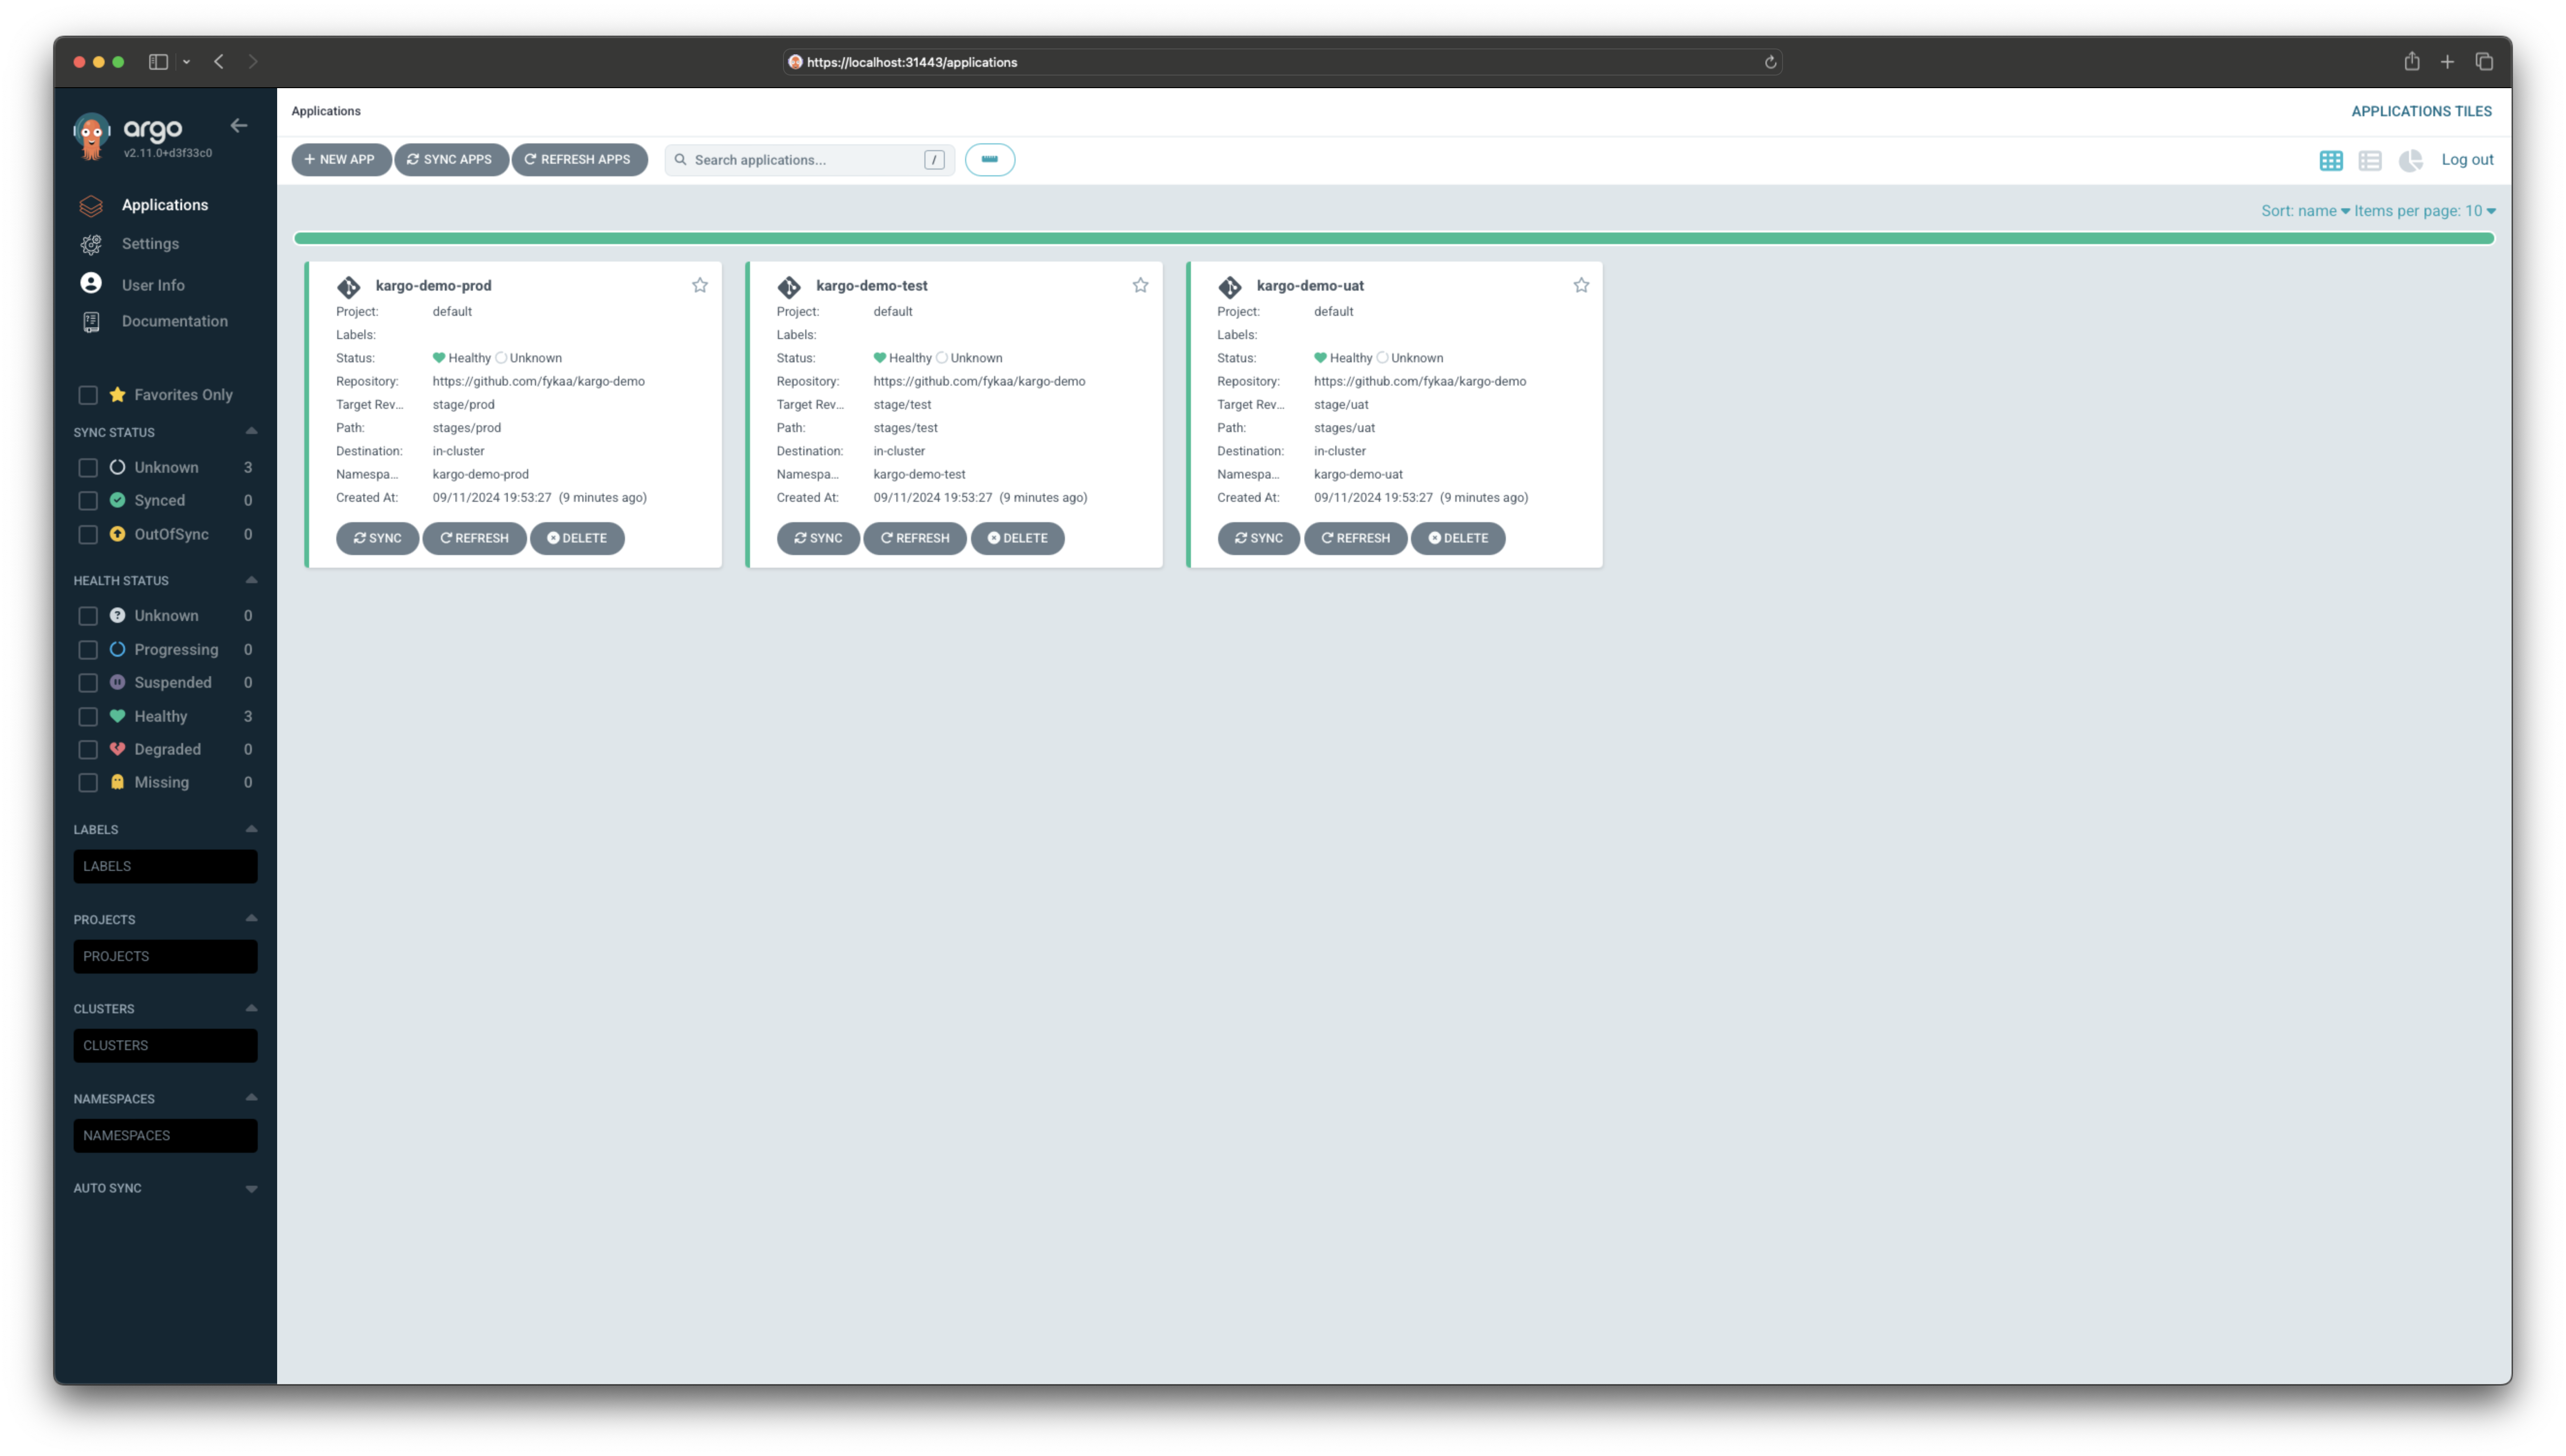
Create Argo CD Applications For Each Stage
We’ll use an Argo CD ApplicationSet to create and manage three Applications,
deploying the sample app to test, uat, and prod namespaces, each
with its own configuration.
cat <<EOF | kubectl apply -f -
apiVersion: argoproj.io/v1alpha1
kind: ApplicationSet
metadata:
  name: kargo-demo
  namespace: argocd
spec:
  generators:
  - list:
      elements:
      - stage: test
      - stage: uat
      - stage: prod
  template:
    metadata:
      name: kargo-demo-{{stage}}
      annotations:
        kargo.akuity.io/authorized-stage: kargo-demo:{{stage}}
    spec:
      project: default
      source:
        repoURL: ${GITOPS_REPO_URL}
        targetRevision: stage/{{stage}}
        path: .
      destination:
        server: https://kubernetes.default.svc
        namespace: kargo-demo-{{stage}}
      syncPolicy:
        syncOptions:
        - CreateNamespace=true
EOF
✅ Argo CD Applications created.
What you'll see in Argo CD
When you visit the Argo CD dashboard, the branches
referenced by the targetRevision fields do not exist yet, and the
Applications will be out of sync. Kargo will create them on first promotion.
Create Your Kargo Project and Pipeline
Run the following command to set up your pipeline. This will create:
-
A
Warehousethat polls the public ECR registry for new versions of the Nginx image -
A
PromotionTaskthat defines a reusable promotion process -
Three
Stageresources that define how Freight moves through your pipeline
- Using kubectl
- Using the Kargo CLI
cat <<EOF | kubectl apply -f -
apiVersion: kargo.akuity.io/v1alpha1
kind: Project
metadata:
  name: kargo-demo
---
apiVersion: v1
kind: Secret
type: Opaque
metadata:
  name: kargo-demo-repo
  namespace: kargo-demo
  labels:
    kargo.akuity.io/cred-type: git
stringData:
  repoURL: ${GITOPS_REPO_URL}
  username: ${GITHUB_USERNAME}
  password: ${GITHUB_PAT}
---
apiVersion: kargo.akuity.io/v1alpha1
kind: Warehouse
metadata:
  name: kargo-demo
  namespace: kargo-demo
spec:
  subscriptions:
  - image:
      repoURL: public.ecr.aws/nginx/nginx
      constraint: ^1.29.0
      discoveryLimit: 5
---
apiVersion: kargo.akuity.io/v1alpha1
kind: PromotionTask
metadata:
  name: demo-promo-process
  namespace: kargo-demo
spec:
  vars:
  - name: gitopsRepo
    value: ${GITOPS_REPO_URL}
  - name: imageRepo
    value: public.ecr.aws/nginx/nginx
  steps:
  - uses: git-clone
    config:
      repoURL: \${{ vars.gitopsRepo }}
      checkout:
      - branch: main
        path: ./src
      - branch: stage/\${{ ctx.stage }}
        create: true
        path: ./out
  - uses: git-clear
    config:
      path: ./out
  - uses: kustomize-set-image
    as: update
    config:
      path: ./src/base
      images:
      - image: \${{ vars.imageRepo }}
        tag: \${{ imageFrom(vars.imageRepo).Tag }}
  - uses: kustomize-build
    config:
      path: ./src/stages/\${{ ctx.stage }}
      outPath: ./out
  - uses: git-commit
    as: commit
    config:
      path: ./out
      message: \${{ task.outputs.update.commitMessage }}
  - uses: git-push
    config:
      path: ./out
  - uses: argocd-update
    config:
      apps:
      - name: kargo-demo-\${{ ctx.stage }}
        sources:
        - repoURL: \${{ vars.gitopsRepo }}
          desiredRevision: \${{ task.outputs.commit.commit }}
---
apiVersion: kargo.akuity.io/v1alpha1
kind: Stage
metadata:
  name: test
  namespace: kargo-demo
spec:
  requestedFreight:
  - origin:
      kind: Warehouse
      name: kargo-demo
    sources:
      direct: true
  promotionTemplate:
    spec:
      steps:
      - task:
          name: demo-promo-process
        as: promo-process
---
apiVersion: kargo.akuity.io/v1alpha1
kind: Stage
metadata:
  name: uat
  namespace: kargo-demo
spec:
  requestedFreight:
  - origin:
      kind: Warehouse
      name: kargo-demo
    sources:
      stages:
      - test
  promotionTemplate:
    spec:
      steps:
      - task:
          name: demo-promo-process
        as: promo-process
---
apiVersion: kargo.akuity.io/v1alpha1
kind: Stage
metadata:
  name: prod
  namespace: kargo-demo
spec:
  requestedFreight:
  - origin:
      kind: Warehouse
      name: kargo-demo
    sources:
      stages:
      - uat
  promotionTemplate:
    spec:
      steps:
      - task:
          name: demo-promo-process
        as: promo-process
EOF
Download the Kargo CLI for your operating system and CPU architecture from the Kargo Dashboard's Downloads page:
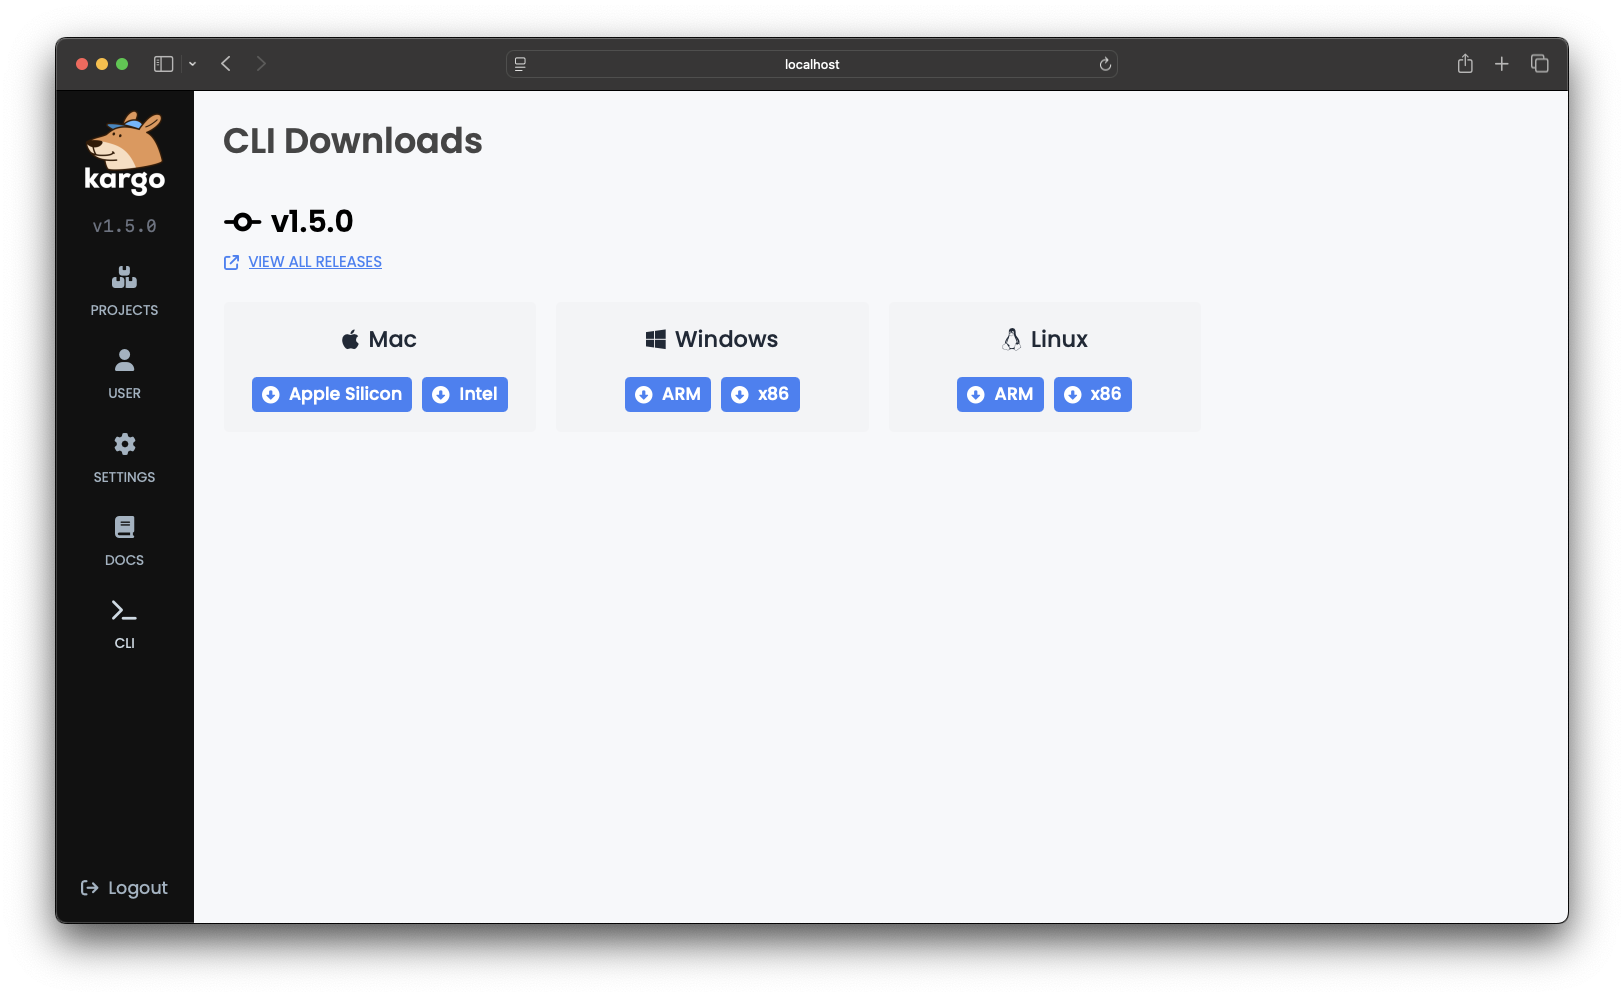
Rename the downloaded binary to kargo (or kargo.exe for Windows) and move it
to a location in your file system that is included in the value of your PATH
environment variable.
Log in:
kargo login http://localhost:31081 \
  --admin \
  --password admin
To create Kargo resources, use the following command:
cat <<EOF | kargo apply -f -
apiVersion: kargo.akuity.io/v1alpha1
kind: Project
metadata:
  name: kargo-demo
---
apiVersion: v1
kind: Secret
type: Opaque
metadata:
  name: kargo-demo-repo
  namespace: kargo-demo
  labels:
    kargo.akuity.io/cred-type: git
stringData:
  repoURL: ${GITOPS_REPO_URL}
  username: ${GITHUB_USERNAME}
  password: ${GITHUB_PAT}
---
apiVersion: kargo.akuity.io/v1alpha1
kind: Warehouse
metadata:
  name: kargo-demo
  namespace: kargo-demo
spec:
  subscriptions:
  - image:
      repoURL: public.ecr.aws/nginx/nginx
      constraint: ^1.29.0
      discoveryLimit: 5
---
apiVersion: kargo.akuity.io/v1alpha1
kind: PromotionTask
metadata:
  name: demo-promo-process
  namespace: kargo-demo
spec:
  vars:
  - name: gitopsRepo
    value: ${GITOPS_REPO_URL}
  - name: imageRepo
    value: public.ecr.aws/nginx/nginx
  steps:
  - uses: git-clone
    config:
      repoURL: \${{ vars.gitopsRepo }}
      checkout:
      - branch: main
        path: ./src
      - branch: stage/\${{ ctx.stage }}
        create: true
        path: ./out
  - uses: git-clear
    config:
      path: ./out
  - uses: kustomize-set-image
    as: update
    config:
      path: ./src/base
      images:
      - image: \${{ vars.imageRepo }}
        tag: \${{ imageFrom(vars.imageRepo).Tag }}
  - uses: kustomize-build
    config:
      path: ./src/stages/\${{ ctx.stage }}
      outPath: ./out
  - uses: git-commit
    as: commit
    config:
      path: ./out
      message: \${{ task.outputs.update.commitMessage }}
  - uses: git-push
    config:
      path: ./out
  - uses: argocd-update
    config:
      apps:
      - name: kargo-demo-\${{ ctx.stage }}
        sources:
        - repoURL: \${{ vars.gitopsRepo }}
          desiredRevision: \${{ task.outputs.commit.commit }}
---
apiVersion: kargo.akuity.io/v1alpha1
kind: Stage
metadata:
  name: test
  namespace: kargo-demo
spec:
  requestedFreight:
  - origin:
      kind: Warehouse
      name: kargo-demo
    sources:
      direct: true
  promotionTemplate:
    spec:
      steps:
      - task:
          name: demo-promo-process
        as: promo-process
---
apiVersion: kargo.akuity.io/v1alpha1
kind: Stage
metadata:
  name: uat
  namespace: kargo-demo
spec:
  requestedFreight:
  - origin:
      kind: Warehouse
      name: kargo-demo
    sources:
      stages:
      - test
  promotionTemplate:
    spec:
      steps:
      - task:
          name: demo-promo-process
        as: promo-process
---
apiVersion: kargo.akuity.io/v1alpha1
kind: Stage
metadata:
  name: prod
  namespace: kargo-demo
spec:
  requestedFreight:
  - origin:
      kind: Warehouse
      name: kargo-demo
    sources:
      stages:
      - uat
  promotionTemplate:
    spec:
      steps:
      - task:
          name: demo-promo-process
        as: promo-process
EOF
Open the Kargo Dashboard and select the kargo-demo
project. You should see the pipeline, and Freight should appear in the upper
left after a few seconds.
What you'll see in Kargo
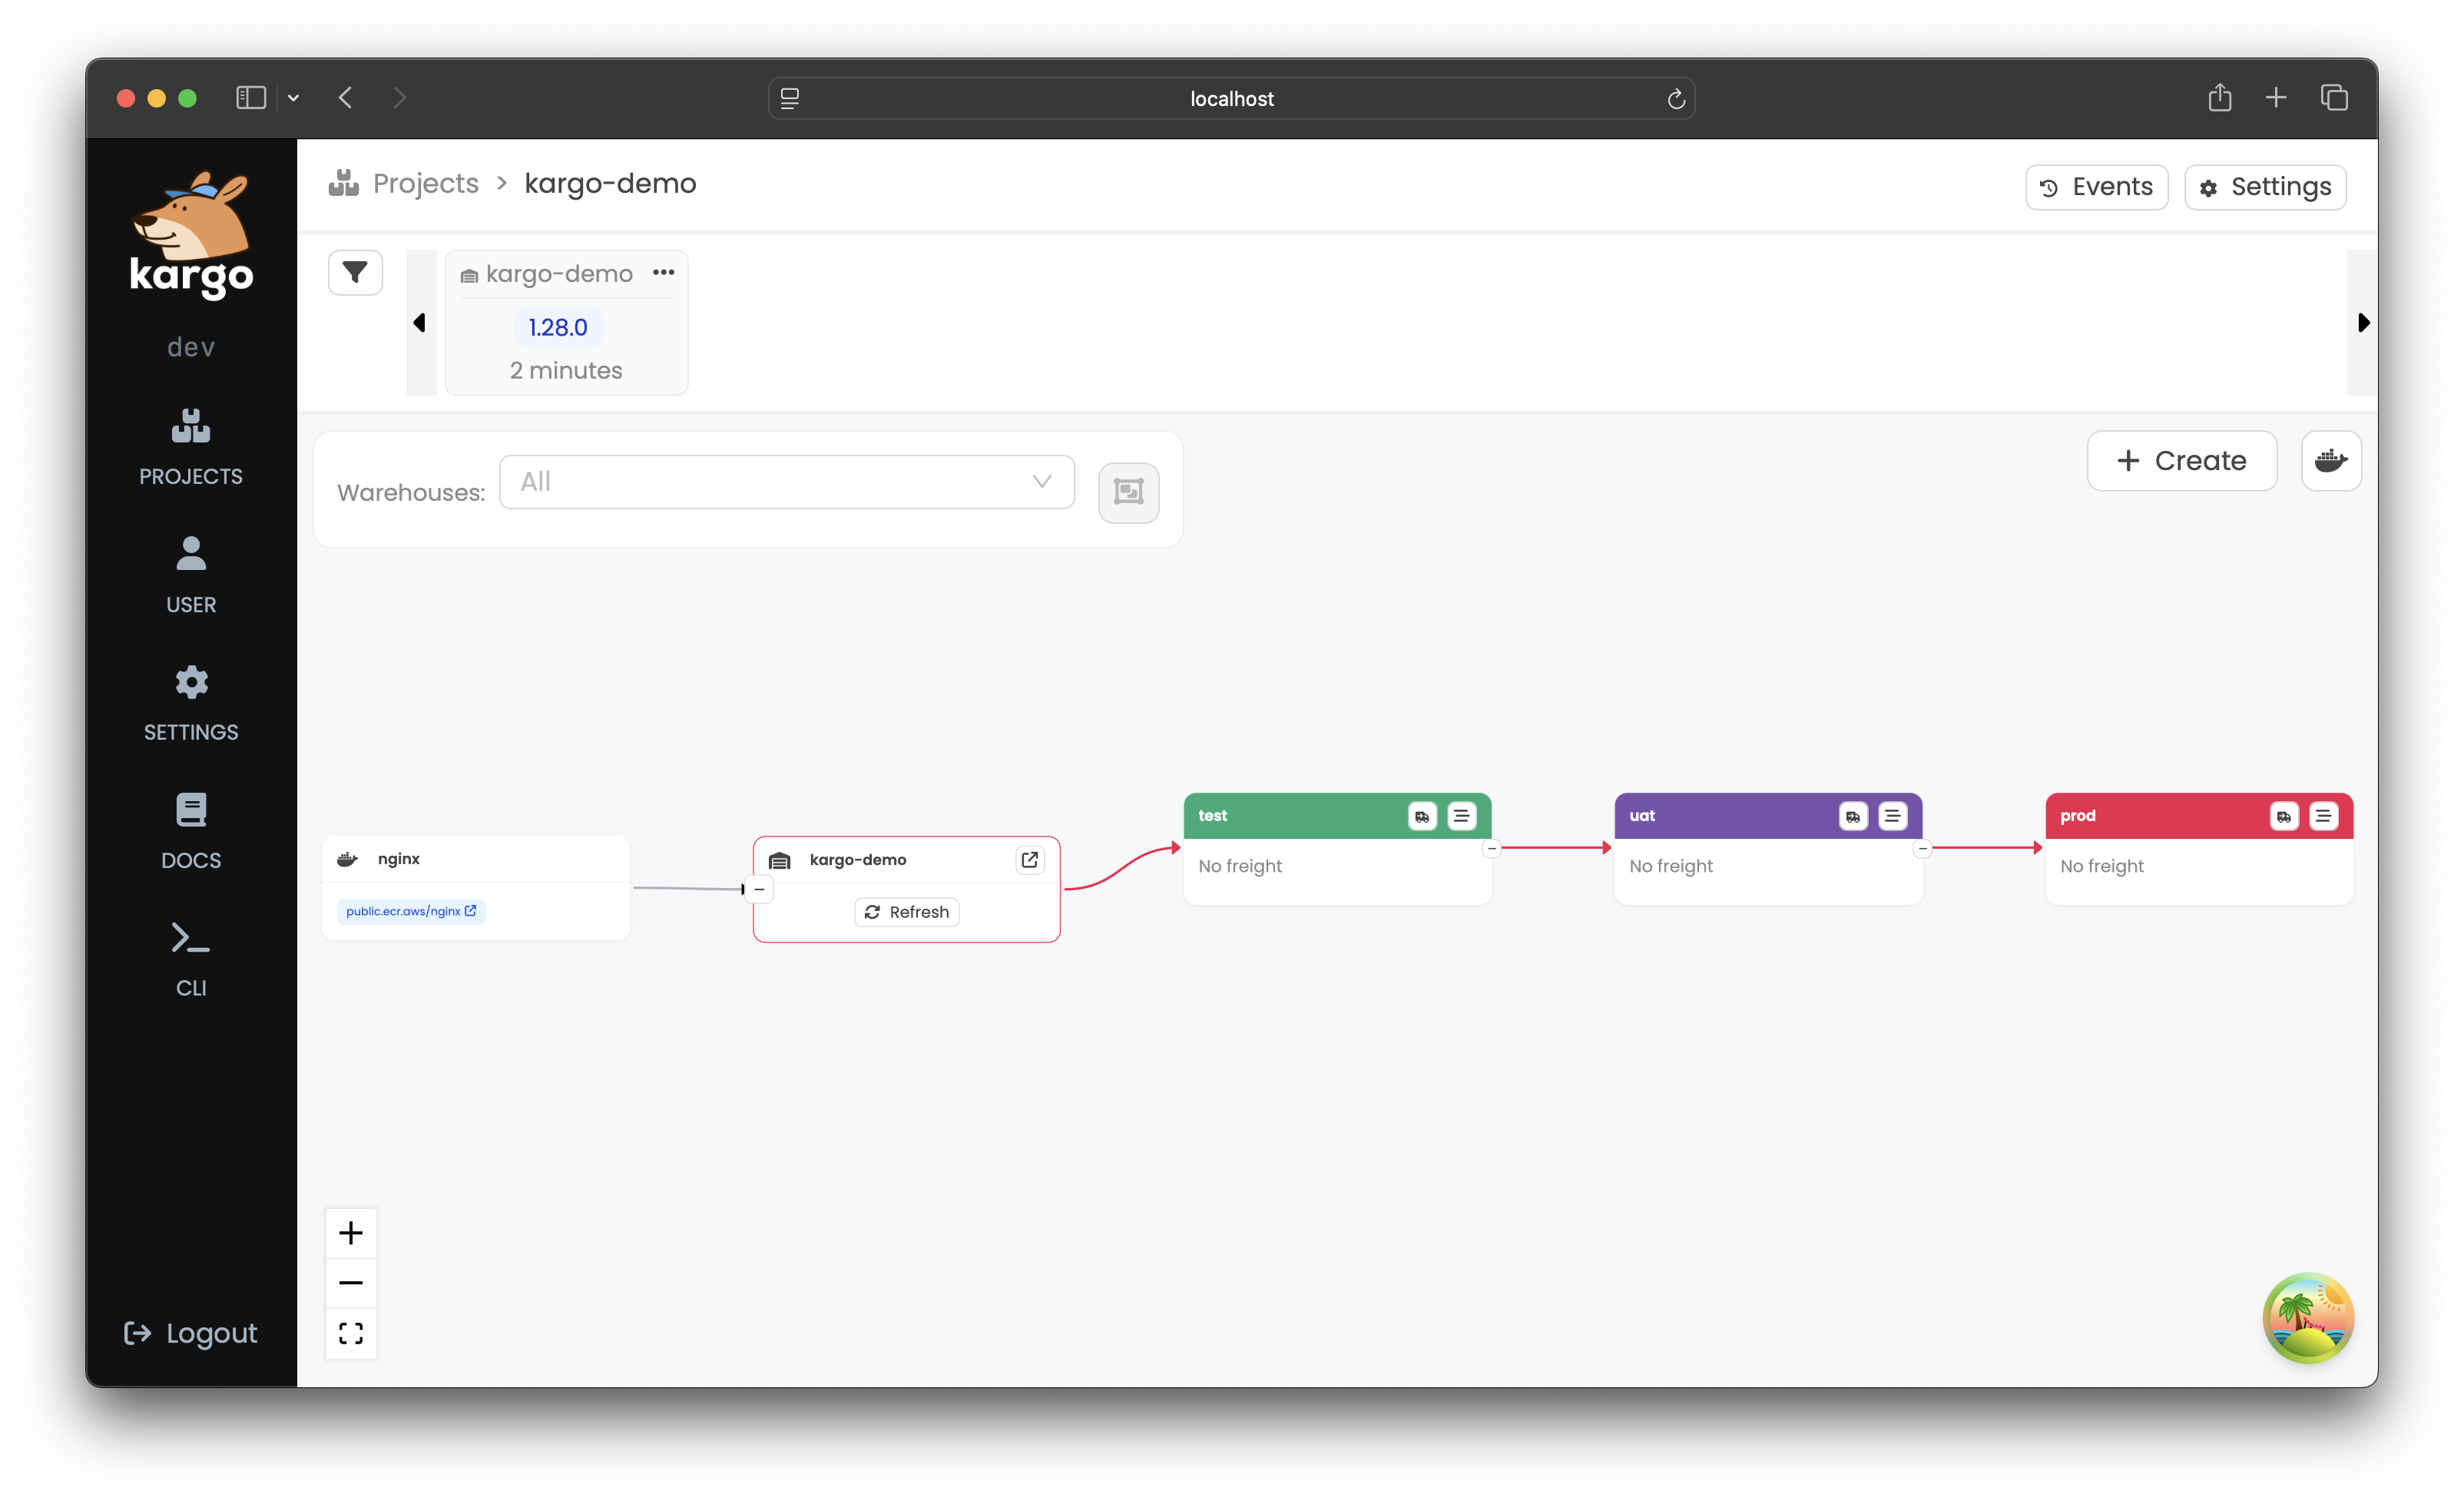
✅ Pipeline created, and Freight is available to promote.
Promote Freight to the Test Stage
In the Kargo Dashboard:
-
Locate the
Freightin the timeline at the top of the screen. -
Drag it using the ⋮⋮ handle.
-
Drop it into the test
Stage.
Alternative: Promote from the Stage Menu
In the test Stage, click the truck icon (🚚) in the header.
-
Select Promote.
-
Choose the
Freightyou want to promote. -
Click Promote to confirm.
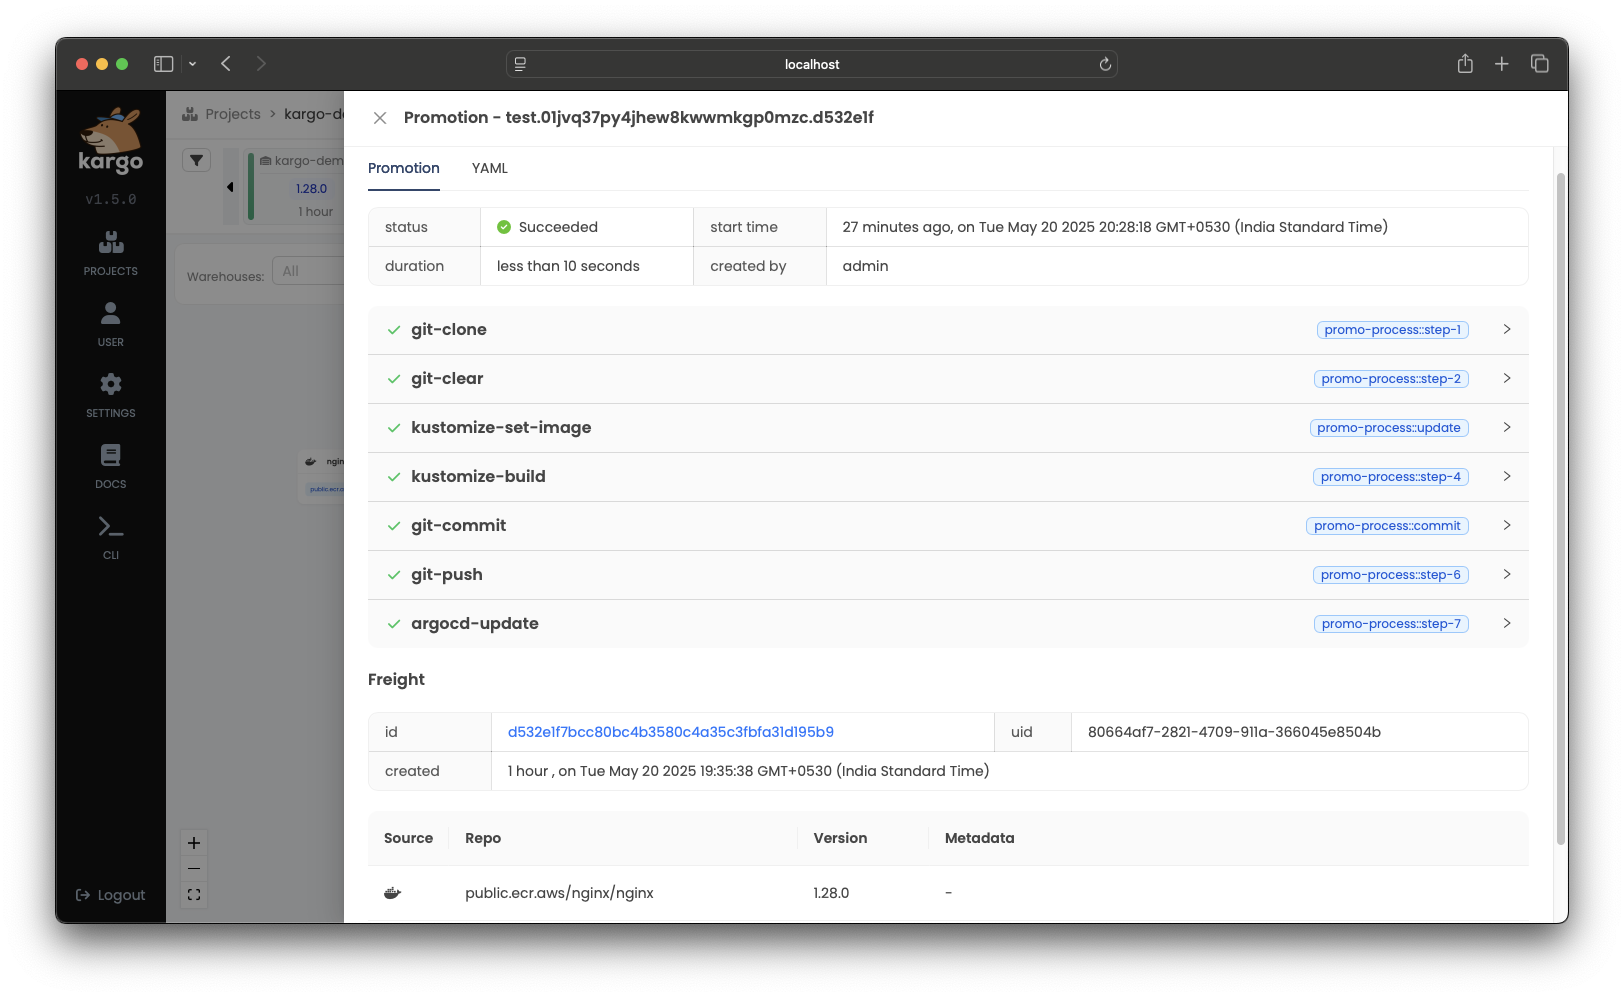
A summary of the Promotion will pop up and will be updated in real-time as the
steps of the promotion process complete. Once the steps have completed, the
Promotion's status will change to Succeeded.
What Freight is deployed to what Stage?
Every piece of Freight in the timeline is color-coded to indicate which
Stages (if any) are actively using it.
In this example, Freight matches the test Stage’s color once it has been
successfully promoted.
What happened behind the scenes?
When you visit your fork at
https://github.com/<your github username>/kargo-demo, you'll see:
-
Kargo created a stage/test branch
-
It read the latest manifests from
main, rankustomize edit set imageandkustomize buildinstages/test/ -
The resulting manifests were committed to the stage-specific branch — the same branch referenced by the test Argo CD
Application’stargetRevisionfield
Best Practice: The Kargo team recommends using stage-specific branches.
✅ After the Freight passes the health checks, you'll see a ❤️ on the test
node. Click the Freight to confirm it shows Verified in test
which will unlock it for promotion to uat.
Kargo can intermittently be slow to recognize health status changes in an Argo
CD Application, which can prevent a Stage that interacts with it from being
counted as healthy.
If your test Stage shows an unknown health status for a prolonged period,
expand it by clicking the icon with three lines, then click Refresh
in the upper right of the page. This will force any changes in the
Application's health status to be observed, allowing the Stage itself to be
counted as healthy.
This intermittent slowness will be addressed in an upcoming release.
Promote to UAT and then Production
Repeat the same steps for uat, then prod:
(The Freight node will
progressively color-match each stage as it passes through.)
-
Click the truck icon on each
Stage. -
Select
Freight. -
Click Promote.
Freight cannot be promoted to the prod Stage until uat verification
has passed and the Stage reaches a Healthy state. Verification checks may
take a few minutes to reconcile.
| 🧪 test | 🔬 uat | 🚀 prod |
|---|---|---|
| http://localhost:32080 | http://localhost:32081 | http://localhost:32082 |
✅ All stages promoted! 🎉
Why can’t I promote directly from test to prod?
Unlike the test Stage, which subscribes to a Warehouse that polls an
image repository in ECR, the uat and prod Stages subscribe to other,
upstream Stages, forming a promotion pipeline:
uatsubscribes totestprodsubscribes touat
This means Freight must flow through each Stage in order: test → uat
→ prod.
Exploring the Kargo Dashboard
The Kargo Dashboard gives you visibility into how Freight moves through your environments.
Within a Stage, you can explore:
-
Promotions – See when
Freightwas promoted, by whom, and to whichStage. -
Verifications – View the status and logs of verification steps.
-
Freight History – Track which versions have flowed through the environment over time.
-
Settings – The defined behavior of the
Stage: what it subscribes to and how promotions and verifications are defined. -
Live Manifest – The current state of the
Stageresource as it exists in the cluster. If things go wrong, the live manifest provides more depth of detail than UI elements.
Together, these views provide a clear audit trail and real-time insight into your promotion pipeline.
Cleaning Up
Congratulations! You've successfully set up your first promotion pipeline!
Now let's clean up!
- Docker Desktop
- OrbStack
- kind
- k3d
Docker Desktop supports only a single Kubernetes cluster. If you are comfortable deleting not just Kargo-related resources, but all your workloads and data, the cluster can be reset from the Docker Desktop Dashboard.
If, instead, you wish to preserve non-Kargo-related workloads and data, you will need to manually uninstall Kargo and its prerequisites:
curl -L https://raw.githubusercontent.com/akuity/kargo/main/hack/quickstart/uninstall.sh | sh
OrbStack supports only a single Kubernetes cluster. If you are comfortable deleting not just Kargo-related resources, but all your workloads and data, you can destroy the cluster with:
orb delete k8s
If, instead, you wish to preserve non-Kargo-related workloads and data, you will need to manually uninstall Kargo and its prerequisites:
curl -L https://raw.githubusercontent.com/akuity/kargo/main/hack/quickstart/uninstall.sh | sh
Simply destroy the cluster:
kind delete cluster --name kargo-quickstart
Simply destroy the cluster:
k3d cluster delete kargo-quickstart